6.2. Using the NFS Druid
This section describes how to use the NFS Druid to quickly configure an NFS share for client access.
Start the Cluster Status Tool. Verify that the cluster daemons are running; if not, choose Cluster => Start Cluster Service to start the cluster daemons.
In the Cluster Status Tool, choose Cluster => Configure to display the Cluster Configuration Tool.
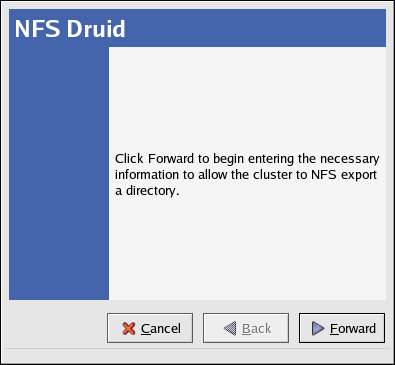
Start the NFS Druid by choosing Add Exports => NFS... and click Forward to continue.
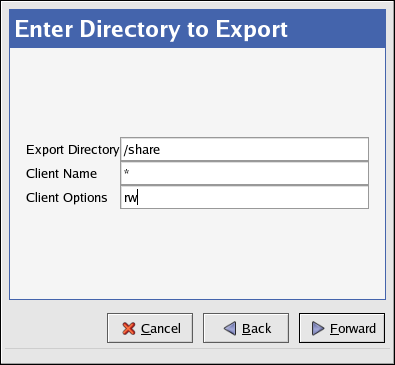
Enter the Export Directory — Specified as a child of a device, the export directory can be the same as the mount point. In this case, the entire file system is accessible through NFS. Alternatively, you can specify a portion (subdirectory) of a mounted file system to be mounted (instead of the entire file system). By exporting subdirectories of a mountpoint, different access rights can be allocated to different sets of NFS clients.
Enter the Client Name — Specified as a child of an export directory, the NFS client specification identifies which systems will be allowed to access the file system as NFS clients. You can specify individual systems (for example, fred) or groups of systems by using wildcards (for example, *.example.com). Entering an asterisk (*) in the Client Name field allows any client to mount the file system.
Enter any Client Options in the provided fields — Specified as part of the NFS Export Client information, this field defines the access rights afforded to the corresponding client(s). Examples include ro (read only), and rw (read write). Unless explicitly specified otherwise, the default export options are ro,async,wdelay, root_squash. Refer to the exports(5) manpage for more options.
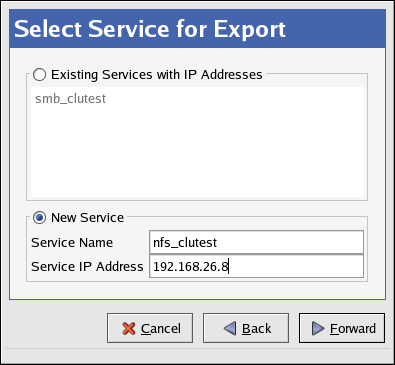
If an existing service contains the device and mountpoint configuration for the directory you want to NFS export, then select that existing service. Otherwise, enter a new Service Name and Service IP Address for the NFS export directory.
Service Name — A name used to uniquely identify this service within the cluster (such as nfs_cluster or marketing.)
Service IP Address — NFS clients access file systems from an NFS server which is designated by its IP address (or associated hostname). To keep NFS clients from knowing which specific cluster member is the acting NFS server, the client systems should not use the cluster member's hostname as the IP address from which a service is started. Rather, clustered NFS services are assigned floating IP addresses which are distinct from the cluster server's IP addresses. This floating IP address is then configured on whichever cluster member is actively serving the NFS export. Following this approach, the NFS clients are only aware of the floating IP address and are unaware of the fact that clustered NFS server has been deployed.
For non-clustered file systems, the mount information is typically placed in /etc/fstab. However, clustered file systems must not be placed in /etc/fstab. This is necessary to ensure that only one cluster member at a time has the file system mounted. Failure to do so will likely result in file system corruption and system crashes.
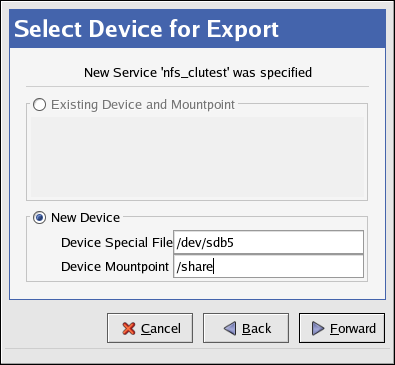
If you selected an existing service, then devices for that service will be listed under Existing Device and Mountpoint. If the device and mount point for your NFS export is listed, then select it.
Otherwise, select New Device and use the fields to edit the following settings.
Device Special File — Designates the disk or partition on shared storage.
Device Mountpoint — Specifies the directory on which the file system will be mounted. An NFS service can include more than one file system mount. In this manner, the file systems will be grouped together as a single failover unit.
At the end of the NFS Druid, click Apply to create the service. Save the configuration by choosing File => Save from the Cluster Configuration Tool.
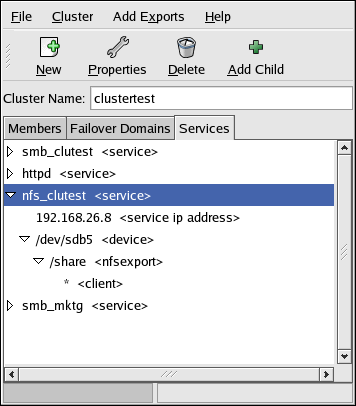
To modify your NFS service configuration, click the
Services tab in the
Cluster Configuration Tool and click the triangular icon
 next to the NFS service to display the full child
tree for the service. Double-click each child to modify options.
next to the NFS service to display the full child
tree for the service. Double-click each child to modify options.
Highlight the <service> and click Properties to configure the the following options:
Service Name — A name used to uniquely identify this service within the cluster (such as nfs_cluster or marketing.
Failover Domain — An optional property that specifies a subset (or ordered subset) of cluster members which are eligible to run the service in the event of a failover. You must create the failover domain before you can reference it in an NFS service configuration; see Section 3.9 Configuring a Failover Domain for more information.
Check Interval — An optional property that specifies whether or not to check the status of the NFS daemons at a regular interval (in seconds). The default value is 0 seconds, meaning the daemon status is not checked.
If the service returns an error or does not respond to the status check, the cluster attempts to cleanly shut down the service and start it on another member. If at any point it fails to cleanly shut down the NFS service, the cluster will place the service in a Failed state, requiring the administrator to disable the service first before attempting to restart it.
For the User Script, leave the field as None, as the cluster infrastructure handles NFS service control and status checking.
Choose the <service ip address> child to change the Service IP Address and to enter a Netmask and Broadcast address, which are both set as None by default. If these fields are left as None, then the cluster infrastructure will use the netmask and broadcast IP address configured on the network device of the member running the service.
Choose the <device> child to modify the Device Special File, Device Mount Point, FS Type, and Mount Options. You can also check or uncheck the Force Unmount. When Forced Unmount is enabled, any applications that have the specified file system mounted will be killed prior to disabling or relocating the NFS service (assuming the application is running on the same member that is running the NFS service)
Choose the <nfsexport> child to specify a directory name for clients to mount the exported share.
Choose the <client> child to enter Client Name, any hosts, groups, and domains that are allowed to mount the exported shares (default is * which allows any client to mount the share) and Options for allowed client mount options (such as rw for read-write or ro for read-only).
6.2.1. NFS Client Access
The NFS usage model for clients is completely unchanged from its normal approach. For example, to mount the NFS share from clu1.example.com to the client's /mnt/users/ directory, run the following command:
/bin/mount -t nfs clu1.example.com:/share /mnt/users |
To simplify the mounting of the NFS share for clients, place the following in the client's /etc/fstab file:
clu1.example.com:/share /mnt/users nfs rw,rsize=8192,wsize=8192 0 0 |
For additional NFS mount options, refer to the Red Hat Enterprise Linux System Administration Guide.